
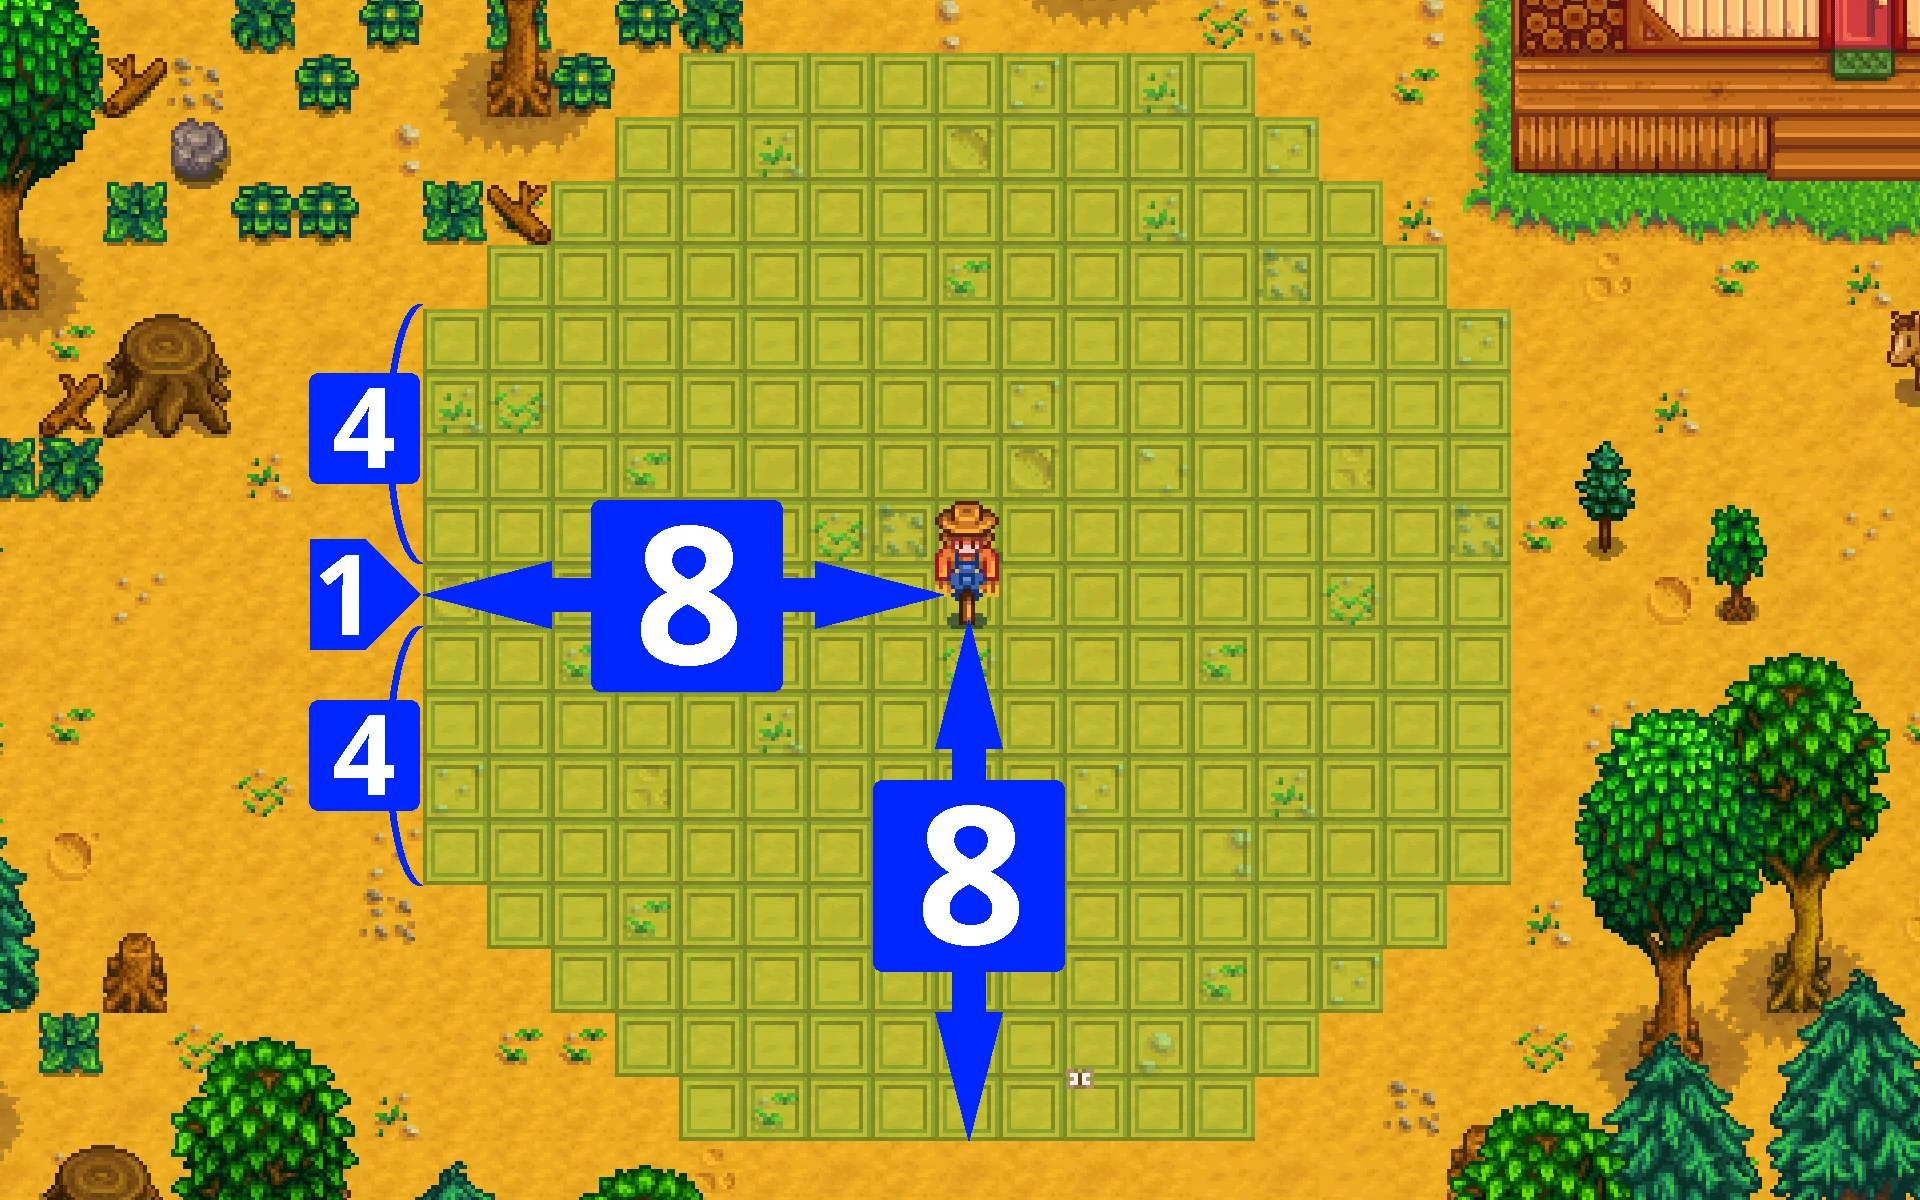
To see the scarecrow radius in Stardew Valley on mobile, you can manually measure by counting eight tiles in each direction, forming a protective circle of 24 tiles. Placing your scarecrow at the center of your crops maximizes this area. Remember, diagonal crops fall outside of its coverage, so plan strategically. Though the game doesn't directly highlight the radius, using visual cues and possibly third-party apps can help visualize your layout. Properly understanding and utilizing scarecrows will elevate your farming game, ensuring better crop yields. Stick around, and you'll uncover more tips to enhance your farm management!
Contents
- 1 Key Takeaways
- 2 Understanding Scarecrow Functionality
- 3 Importance of Scarecrow Radius
- 4 Crafting Your First Scarecrow
- 5 Identifying Scarecrow Radius
- 6 Visual Indicators in the Game
- 7 Optimal Placement Strategies
- 8 Adjusting Your Farm Layout
- 9 Common Mistakes to Avoid
- 10 Enhancing Your Farming Efficiency
- 11 Frequently Asked Questions
- 12 Conclusion
Key Takeaways
- Use in-game features to visualize scarecrow radius by checking the coverage area around the scarecrow icon.
- Count tiles manually from the scarecrow to understand the 8-tile radius for crop protection.
- Consider using third-party apps that provide layout planning tools to visualize scarecrow coverage effectively.
- Place scarecrows strategically at the center of crop areas for maximum coverage and to avoid overlaps.
- Regularly check and adjust your crop placements to ensure all crops are within the scarecrow's protective radius.
Understanding Scarecrow Functionality
To maximize your farming potential in Stardew Valley, it's important to understand how scarecrows work. These handy tools aren't just decorations; they play a crucial role in protecting your crops from pesky crows. Without a scarecrow, you risk significant crop loss, as those feathered thieves can munch on your hard work.
The primary scarecrow benefits include a protective radius of 8 tiles in all directions, which means you can cultivate a considerable area without worrying about losing your harvest to crows. Placing your scarecrow strategically in the center of your crops guarantees maximum coverage, allowing you to focus on farming rather than constantly replacing eaten produce.
Moreover, by crafting additional scarecrows as you progress, you can cover even more ground. This proactive approach not only safeguards your crops but also frees you to explore the many other aspects of Stardew Valley, from fishing to mining. So, as you plan your fields, remember that understanding scarecrow functionality is key to preventing crop loss and guaranteeing a bountiful harvest. Embrace this knowledge, and let your farming dreams flourish!
Importance of Scarecrow Radius
Understanding the importance of scarecrow radius can greatly enhance your farming strategy in Stardew Valley. The scarecrow's radius determines how effectively it protects your crops from crows, which can greatly impact your crop yield. Knowing this radius allows you to optimize your planting strategy and maximize your harvests.
Here's a quick breakdown of scarecrow benefits:
| Scarecrow Benefit | Description |
|---|---|
| Protects Crops | Prevents crows from eating your crops. |
| Expands Planting Area | Allows you to plant more crops efficiently. |
| Increases Crop Yield | Guarantees more crops survive, boosting yields. |
Crafting Your First Scarecrow
After you've grasped the importance of scarecrow radius, it's time to craft your first scarecrow. This essential item will protect your crops from pesky crows and allow you to focus on your farming without constant worry. To get started, you'll need to gather some scarecrow materials. Specifically, you'll need 50 pieces of wood, 20 pieces of fiber, and 1 piece of coal. These materials are fairly easy to find; just chop down trees for wood, forage for fiber in grassy areas, and mine for coal.
Once you've collected the necessary materials, head to your crafting menu. This is where your crafting tools come into play. You don't need anything fancy; just access your inventory and find the crafting icon. Select the scarecrow recipe, and with a simple tap, you can create your scarecrow.
Position your new scarecrow strategically within your farm, as it has a radius of 8 tiles in all directions. This guarantees maximum coverage, keeping those crows at bay. Crafting your first scarecrow is a rewarding step toward safeguarding your crops and enhancing your agricultural freedom in Stardew Valley!
Identifying Scarecrow Radius
To maximize your farming efficiency, understanding a scarecrow's coverage area is essential. By identifying its effective crop protection radius, you can guarantee that your precious plants stay safe from pesky crows. We'll explore some visualization techniques to help you easily see this radius and optimize your farm layout.
Scarecrow Coverage Area
Scarecrows play an essential role in protecting your crops in Stardew Valley, and knowing their coverage area can make all the difference in your farming success. Many players fall victim to scarecrow myths and radius misconceptions, thinking these guardians can cover a wider area than they actually can. The truth is, each scarecrow protects a circular radius of 8 tiles in every direction, creating a total coverage area of 24 tiles.
To maximize your crop safety, you should strategically place your scarecrows throughout your farm. Remember, scarecrows don't protect crops that are diagonal from them, so spacing them evenly is key. If you have large crop fields, consider using multiple scarecrows to guarantee extensive coverage.
Additionally, don't forget about the potential of the deluxe scarecrow, which extends your protection to 10 tiles. By understanding the real dimensions of your scarecrow's coverage area, you can confidently plan your planting and minimize crop loss. So, take a moment to measure, and don't let common misconceptions steer you away from farming success in this vibrant world.
Effective Crop Protection
Understanding your scarecrow's radius is essential for effective crop protection, as it directly impacts how well your crops are safeguarded from pesky crows. To maximize crop yield, you need to take into account various factors, including crop types and seasonal planting. Knowing which crops thrive in specific seasons helps you develop a strategic farm layout that enhances pest control and reduces crow interference.
Soil quality and fertilizer usage play a significant role in your crops' health, so make sure you maintain nutrient-rich soil. Implementing crop rotation not only improves soil health but also minimizes the risk of pests. When planning your irrigation systems, factor in weather effects, as drought or excessive rain can influence your crops' vulnerability to pests.
Utilizing effective harvesting techniques is equally important, as timely harvesting ensures that your crops don't become targets for crows. Keep in mind that each scarecrow protects a radius of 8 tiles in all directions, so position them wisely to cover all your plants. By understanding and optimizing these elements, you'll create a thriving farm environment that minimizes losses and enhances your overall farming experience.
Radius Visualization Techniques
Visualizing your scarecrow's protective radius can greatly enhance your farming strategy. Understanding the area your scarecrow covers helps you maximize crop growth while ensuring they're safe from pesky crows. Here are three effective radius visualization techniques you can use:
- Radius Tools: Utilize in-game features or mods that allow you to see the scarecrow's radius directly. Some tools provide a visual overlay, making it easy to determine which crops are protected.
- Visualization Apps: There are several third-party apps designed specifically for Stardew Valley players. These apps let you input your farm layout and display the scarecrow's radius, helping you plan your crop arrangement efficiently.
- Manual Measurement: If you're not keen on tools or apps, you can always go the manual route. Count tiles from the scarecrow in all directions—remember, it covers a radius of 8 tiles. Mark these areas on your farm layout to keep track of your protected crops.
Visual Indicators in the Game
In Stardew Valley, the game's visual indicators play an essential role in helping you manage your farm effectively. You'll notice various visual cues throughout the game interface that provide critical information about your farm's status. For instance, when you place a scarecrow, you'll see its radius visually represented, allowing you to understand which crops are protected from pesky crows. This clarity helps you maximize your farming efforts.
Moreover, crop growth stages are marked with distinct visual changes. As your crops mature, their appearance shifts, signaling when they're ready for harvest. This visual feedback guarantees you're attentive to your farm's needs without constantly checking your inventory or menus.
Additionally, the game interface highlights various environmental factors, like the presence of weeds or rocks that may hinder your farming efficiency. These indicators empower you to make quick decisions and adjustments, ultimately fostering a better farming experience.
Optimal Placement Strategies
Placing your scarecrow effectively can markedly enhance your farming efficiency in Stardew Valley. To optimize scarecrow positioning, you'll want to maximize the coverage area while ensuring your crop layout remains organized. Here are three strategies to evaluate:
- Center Your Scarecrow: Position your scarecrow at the center of your crop layout, ensuring it covers the maximum 8-tile radius around it. This way, you protect the largest number of crops from pesky crows.
- Space Out Scarecrows: If you have a larger field, contemplate placing multiple scarecrows strategically. Each scarecrow can cover an area of 8 tiles, so spacing them out allows you to protect more crops without overlapping coverage.
- Plan for Crop Rotation: As you harvest and replant different crops, think ahead about your scarecrow positioning. If you're rotating crops, place your scarecrow where it can cover both current and future planting areas effectively.
Adjusting Your Farm Layout
A well-organized farm layout can greatly boost your productivity in Stardew Valley. By focusing on farm organization and layout enhancement, you'll create an efficient space that maximizes your crop yields and minimizes wasted time. Start by planning where you want to place your crops, buildings, and pathways. This will help you navigate your farm with ease and keep everything within reach.
Here's a simple table to visualize your layout:
| Crop Type | Growth Time (Days) | Ideal Placement |
|---|---|---|
| Wheat | 4 | Near Sprinklers |
| Corn | 7 | Along the edges |
| Blueberries | 13 | Central area |
| Cauliflower | 12 | Away from foot traffic |
| Potatoes | 6 | Near storage buildings |
Consider grouping crops with similar growth times together. This way, you can harvest them simultaneously and plan your days more effectively. Don't forget about the importance of pathways; they not only enhance movement but also contribute to the overall aesthetics of your farm. By making these adjustments, you'll find freedom in your farming routine and enjoy the fruits of your labor even more!
Common Mistakes to Avoid
Farming in Stardew Valley can be a rewarding experience, but many players fall into common traps that hinder their progress. To maximize your yields, it's essential to avoid these common mistakes:
- Scarecrow Errors: Many players underestimate the importance of scarecrows. They think they can keep crows away without proper placement, leading to crop loss. Always guarantee your scarecrows cover the right area.
- Radius Misconceptions: A common misconception is that the scarecrow's radius is larger than it actually is. This could result in layout issues, leaving some crops unprotected. Remember, the effective radius is only 8 tiles in every direction!
- Farming Strategies: Failing to take into account crop placement can lead to efficiency blunders. Grouping crops too far from your scarecrow can result in coverage mistakes, allowing pests to wreak havoc on your farm.
Enhancing Your Farming Efficiency
Maximizing your farming efficiency in Stardew Valley isn't just about planting crops; it's about strategic planning and resource management. To truly thrive, you need to embrace crop rotation and seasonal planning. By rotating your crops, you not only maintain soil quality but also maximize your yield. Different crops replenish various nutrients, so alternating them can prevent depletion and keep your land fertile.
Seasonal planning is equally significant. Each season brings different crops with varying growth times and profitability. Make a plan before each season begins. Identify which crops you want to grow and when to plant them to guarantee you're never left with idle land. For instance, if you're planting strawberries in spring, consider what you'll grow in summer after they're harvested.
Additionally, think about your farm layout. Efficiency isn't just about what you plant but where you plant it. Keep your most cared-for crops near your watering source or storage. This way, you save time and energy, allowing you to focus on other aspects of your farm. With thoughtful crop rotation and seasonal planning, you'll transform your Stardew Valley experience into a flourishing success.
Frequently Asked Questions
Can Scarecrows Be Moved After Placement?
Yes, you can move scarecrows after placement. Just pick them up and reposition them. Remember, the scarecrow radius will change based on their new location, so plan accordingly to protect your crops effectively!
Do Scarecrows Protect Crops From All Pests?
Imagine standing in your vibrant field, knowing scarecrows provide crop protection against birds and certain pests. However, their effectiveness doesn't extend to all threats, so consider other defenses to safeguard your harvest.
How Many Scarecrows Do I Need for My Farm?
To determine how many scarecrows you need, consider your farm's size and layout. Proper scarecrow placement guarantees ideal coverage, so aim for one scarecrow every 8 squares to effectively protect your crops from pests.
Can I Craft Scarecrows Without Specific Resources?
You can't craft scarecrows without specific resources, but exploring crafting alternatives opens doors. Each scarecrow type needs unique materials, so gather wisely and let your creative spirit soar, ensuring your farm thrives amidst the crows.
What Happens if a Scarecrow Is Damaged?
If a scarecrow's damaged, its durability decreases, reducing its effectiveness. You can repair it using wood and fiber, restoring its functionality. Keeping your scarecrow in top shape guarantees your crops remain protected from pesky crows.
Conclusion
In Stardew Valley, placing your scarecrows wisely can protect up to 8 crops in each direction, covering a total of 24 tiles. With the right positioning, you can maximize your farming efficiency, ensuring fewer losses to pesky crows. Remember, each scarecrow you craft not only shields your crops but can also enhance your overall yield. So, keep your farm layout in mind, and you'll reap the rewards of a well-protected harvest! Happy farming!

Alma J. Lillard is a passionate writer and gaming enthusiast who brings her deep love for Stardew Valley to every piece she creates. As a contributor to StardewUpdate.Today, Alma covers the latest updates, tips, and in-depth guides for players looking to enhance their Stardew Valley experience.